Monday 30 June 2014

June Indie Pattern Update!


Well it's that time again already, the end of another busy month and time to round up all the latest news from the indie sewing pattern designers! As usual if I have missed anything that you know of, or if you are yourself an indie designer who I have somehow overlooked, please leave me a comment or get in touch via email or twitter and I'll make sure to add the new info in.

New Indie Pattern Companies


  • Many of you may already know Sally of Charity Shop Chic, she's super talented with a pair of scissors and a sewing machine, has an effortless sophisticated sense of style and has just released her first collection of sewing patterns! Capital Chic Patterns launched this week with a summer collection of six super chic womenswear PDF patterns aimed at intermediate to advanced sewists or those who are looking to develop their skills a little more. I was delighted to test the Martini Dress and White Russian Sweatshirt but also have my eye on the Champagne Skirt! Which are your favourites?
  • I'm a long time reader of Katy and Laney's blog and was super excited to see that they had released their very first pattern! Their Tap Shorts are a classic high waisted short with three variations included angled front seams or pleats providing flattering options for all body shapes.
  • Another blogger I'm a big fan of has also released her very first pattern this month! Kelli from True Bias (otherwise known as the blogger with the best hair ever) has released her Hudson Pants pattern. They are a bang on trend pair of knit pants with a relaxed fit around the hip tapering into skinny legs.

New Patterns


  • Jennifer Lauren released a stunner of a pattern for knits this month, the Bronte Top. It must be really comfortable to wear yet looks chic and pulled together because of the unusual vintage inspired overlapping neckline which provides much scope for playing around with contrast binding.
  • Cake Patterns have updated their FREE PDF tee pattern. It looks like a great basic to sew up and adapt and being free too I don't think it can get any better than that!
  • Caroline of Sew Caroline had just released her next pattern this morning! It's called the Waterfall Tank and with it's cascading front panel provides a great canvas for pattern mixing and colour blocking.
  • Pauline Alice has just released the Alameda Dress pattern. I absolutely love the flounced skirt combined with more modern style lines! It's also her very first pattern to come out straight away in paper format, see 'Other Exciting News' for more info.
  • The most recent pattern from Sew Over It is their Ultimate Trousers! Lisa very kindly sent me a copy and I can't wait to get started on them as I've been thinking about this slim, classic style for a while now. Plus Lisa made up 5 pairs in a week so they sound like a lovely speedy project (once I've nailed the fit! Eeek!)
  • Melissa from Fehr Trade's range of sportswear patterns are proving very popular and her most recent pattern can be made up for casual wear too! The VNA top features some clever and unusual seam lines inspired by the 1930s Vionnet gowns.
  • I'm yet to try any of the gorgeous knicker patterns from Measure Twice Cut Once but I need to get a move on! This month they released a FREE Unisex Boxer Short pattern via Peppermint Magazine. I love the included variations to make them more masculine or feminine.
  • Iconic Patterns released a new pattern for a Wiggle Skirt. It's made for stretch fabrics and features some awesome style lines and panelling which provides great opportunity for colour blocking and flattering print combinations. Lena's written a great post about the fit of stretch fabrics too.
  • The newest pattern from Waffle Patterns is the Warabi Kimono Sleeved Tunic featuring wide sleeves and a cross over neckline. It instantly conjures up images of floaty resort wear for me! 
  • With thanks to Emmie for bringing this one to my attention, Simple Sew Patterns released a new pattern this month (the Lottie Skirt and Blouse) which is currently available in paper form FREE with Love Sewing magazine. What a fantastic opportunity to try a new company!

Sew-Alongs


Other Exciting News


  • Kate and Rose Patterns have just launched paper versions of their recently released Midtown Collection and Roza Blouse/Dress! And they are currently 20% off in their Etsy shop (along with everything else) until Wednesday 2nd July. After that only PDF copies will be available until September so get in quick if you want to try one out!
  • After all the excitement of their first pattern in PDF format being released last month, Sewaholic Patterns have now released their ever popular Renfrew Top in digital form. it's now even more the perfect pattern for a speedy afternoon make; purchase to wearing in a matter of hours!
  • Thread Theory are running a tutorial competition! In a nutshell to enter you need to write a tutorial inspired by/based on one of the Thread Theory patterns and the winning tutorials (there are various categories) will be published on their site. The closing date is 21st July so you've got plenty of time: check out the full details here.
  • Named had a midsummer sale on a selection of their patterns. Did you snap up any bargains? I've had my eye on the Ailakki Jumpsuit for a while now but it wasn't included this time!
  • Pauline Alice has just opened her new pattern store and unveiled paper formats for all of the patterns she has released so far! I love Pauline's style so can't wait to get my hands on a copy of one to check out the packaging!
  • UPDATE! This is super exciting news! Tilly (of Tilly and the Buttons) is looking to hire someone part time to manage sales, shipping and customer service for her rapidly expanding business. I'm so wishing I could make my regular job part time and do this; if you're interested check out the full job description here.


And to finish up as usual a little inspiration for you all. I appear to be really feeling the swimsuit sewing at the moment; I had to stop myself from making all five picks swimwear!


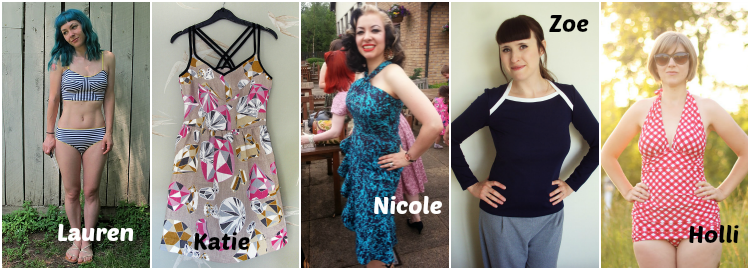
  • I fell pretty much instantly in love with Lauren's stunning striped Soma Swimsuit. She's used those stripes to perfection plus there's yellow strapping! Now I've made the Bombshell I don't think I can resist giving this a whirl...
  • I can't believe that Katie's Centuaree Dress was intended just as a wearable muslin! The piecing of the bodice kind of reflects the formation of the diamonds in the print, plus the criss-cross contrasting straps give it that extra something!
  • Nicole's dress she made for the big Minerva meet-up is so PERFECT on her! She used the bodice of the Lonsdale dress (which is a fave of mine) and drafted her own skirt. You are rocking that look lady.
  • And Zoe's top is equally PERFECT for her! Her Bronte top really grabbed my attention; the combination of white binding on that style of neckline gives it both a retro and nautical twist.
  • I love Holli's amazing gingham bombshell swimsuit! (Where does all this amazing swimsuit fabric come from?!) Although to be honest I had a hard time picking between this and her metallic dotted version

I can't wait to see what July holds to inspire my future wardrobe! 

Sunday 29 June 2014

Pattern Testing: The Martini Dress from Capital Chic

I've got some exciting news for you today! There's a new indie pattern company in town! I've long admired not only the classic and sophisticated style of Sally from Charity Shop Chic but her ability to turn at first glance ugly garments into beautiful pieces with some pattern cutting magic. So you can imagine how excited I was when she revealed to me a couple of months ago that she was releasing her own line of PDF sewing patterns as Capital Chic Patterns. (FYI I am lucky enough to count Sally as a friend and cocktail buddy but all the opinions I share with you here are unbiased and honest) 

She's started with a bang with a collection of six gorgeous womenswear designs, each with multiple variations and print-at-home or print-at-copy shop options. The designs are focused on workwear, cocktail wear and day-to-night looks and are intended to have a modern, fashionable feel with clean lines and well thought out details. They are also each named after a well known cocktail which suits Sally down to the ground! The patterns are currently available in sizes UK10-18 and come complete with fully illustrated instructions. I'm delighted that they are designed with intermediate to advanced sewers in mind and so give indie pattern lovers the opportunity to try out some new techniques and develop their skills. Make sure to check out the whole Summer line here.

Diary of a Chainstitcher: Capital Chic Martini Dress Two Piece

I was so happy to be asked to test and I knew I wanted to test the Martini Dress from the second I saw the preview. I love the flattering illusion the boxy crop top and (boned!) fitted high waist creates plus the shaping of the armholes and length of the skirt is so chic. I decided to go for it and try out the midriff flashing trend that is so popular at the moment so made up the two piece view B. There's also the option to make this up as a one piece which looks like separates if you are wary of having skin on show. I feel comfortable in this as it is but if making up this variation again would definitely add a little length to the crop top as I am wary of flashing something I don't want to! I'm fairly short, particularly in the body so if you are on the tall side you will definitely need to add some length.

Diary of a Chainstitcher: Capital Chic Martini Dress Two Piece

I cut a size 2 and the fit was pretty much spot on straight out of the printer. Along with lengthening the crop top by and inch or two I might taper this bottom edge in slightly for some added security but apart from that it all sits really nicely. I used a stretch cotton sateen which I picked up ages ago in Unique Fabrics on Goldhawk Road. It's really great stuff and they have a great range of colours if you are looking for some solid sateen. I only needed 1.2 metres (150cm wide) to make this up! You can make the Martini in a non stretch fabric but I think I would recommend a woven with a teeny bit of stretch like this sateen as it does make it slightly easier to sit and manoeuvre in. I love the snug fit of the waist and skimming fit over the hips and a bit of give in the fabric meant I didn't have to compromise the look of this.

Diary of a Chainstitcher: Capital Chic Martini Dress Two Piece

I can only speak for this pattern and the White Russian Sweatshirt which I also tested but I'm sure my thoughts about the pattern instructions translate across all the patterns as I know a lot of work went into these. The construction methods described involve some slightly more advanced techniques than other indie patterns I have come across and give you a beautiful clean finish. For me this all resulted in a garment that was one step closer to professional than my normal makes are. In fact this was intended as a wearable muslin but I'm so pleased with the construction it will definitely be getting worn to drink a cocktail or two!

Although these patterns are aimed at dressmakers with some experience I definitely think they would be a great choice if you are feeling confident with beginner patterns and want to step your sewing up a notch. The instructions may be more brief in places than you are used to but the more complicated steps are explained thoroughly and clearly. There were a couple of tricks involved which I had never tried before and I'm really pleased with the result first go.

Diary of a Chainstitcher: Capital Chic Martini Dress Two Piece

So if you're tempted to challenge yourself what exactly is involved in making this up? Well it's fully lined, and the instructions for the skirt in particular ensure this is done in the absolute neatest fashion. I always like clean and tidy insides and it makes it so lovely to wear! The lining is mainly attached by machine, with the exception being caught to the edge of the zip on the crop top by hand. There's a really fun 'rolling' technique used to finish the armholes which reminded me of the 'burrito' method for constructing shirt yokes. I chose to use a purple silk habotai (china silk) I had lurking in my stash. It's possibly a little lightweight to be serving as the base to attach the boning too but everything stays in place when worn and it's nice against the skin.

Diary of a Chainstitcher: Capital Chic Martini Dress Two Piece

One aspect of this make that I felt a little nervous about was the open-ended zip needed for the crop top as I'd never installed one before. It was just as straightforward as any other zip though and Sally has a great method for inserting both this and the zip of the skirt. You might want to hold off buying your zip until you've either made a muslin or sewn up enough to work out how long your want your crop top and therefore how long you need your zip to be, although it is possible to shorten them anyway. I got my zip from Maculloch and Wallis where I also got the sew in boning which I highly recommend. It gives just the right amount of support whilst still allowing some amount of flexibility plus it's so easy to use; just cut to length with normal scissors and sew it straight on to your lining by machine! Whilst we're on the subject of boning I must say I adore the inclusion of it in this pattern. This was the first time I'd used boning in any of my projects (with the exception of my tutu which was an entirely different kettle of fish!) and I had such fun with it. Sally's diagram to explain placement is fab and it really helps keep that

Diary of a Chainstitcher: Capital Chic Martini Dress Two Piece

The one part I did come unstuck with was lining the centre back vent of the skirt. I read through the instructions a few times and did a bit of a google but was feeling pretty puzzled; it seems the construction of a lined vent is pretty hard to explain! In the end I just ploughed on ahead and gave it a whirl, the worst that could happen is a bit of unpicking after all. I'm not sure if I did it the right way but it ended up turning out beautifully! I have never felt so proud of any part of my finishing. I did feed back to Sally that I didn't feel I understood this correctly and I know she has reworked the instructions and illustrations for this part so fingers crossed you should now have no problems! She's also planning on putting up a tutorial complete with photographs for this step on the Capital Chic blog in the near future.

Diary of a Chainstitcher: Capital Chic Martini Dress Two Piece

Sally, thank you for the fantastic pattern and congratulations! May there be many more patterns, successes and cocktails to come! I'll be back soon with my pattern test version of the White Russian Sweatshirt which I can't wait to share with you! Have you checked out the whole of the first Capital Chic collection yet? Which are your favourites?

Sally and I at fellow Spoolette Roisin's Hen Do. Photo courtesy of What Katie Sews

Wednesday 18 June 2014

Behind the Scenes at the John Lewis Sewing Bee!

Following on from my post at the weekend about the dress I made at the sewing bee to celebrate the 150th anniversary of John Lewis I thought I'd share some pics and info about what went on during the day. I don't want to speak for everyone but I'm pretty sure that we all had an awesome time! Thank you to the John Lewis team for looking after us so well and Brian Doherty for taking the majority of the beautiful photos included in this post. It's so lovely to have some photos of me and the girls sewing!


On arrival at the Oxford Street store that morning we spent a bit of time deliberating over our fabric and pattern choices then set to cutting out straight away. Lots of ladies cutting full skirted dresses meant we took over the haberdashery department slightly! Once we were cut out and ready to sew we all settled down around one large table which was a really enjoyable set up. I was so engrossed in sewing and chit chat I almost forgot where we were at points! It was great chatting to the John Lewis customers about what they sew, how they/we learned and our preferred techniques and tips. A few familiar Spoolette faces popped in to see us too!

How much mess can seven seamstresses make?!

As if sewing and chatting all day with some of my favourite sewing ladies wasn't enough we were given a delicious lunch plus each provided with Cath Kidston aprons to sew in and fabulous Prym tool kits packed with sewing goodies to help us along in our challenge.


I was delighted to get the chance to try out some tools that I've been tempted by for a while. I've always just grabbed a chopstick or blunt pencil for pushing out points when turning things through, I really didn't believe that a made for purpose point turner could make that much difference. But it really does!


The washable pen is amazing for marking on darts, pleats and in my case boning placement lines incredibly accurately. It obviously won't work on all fabrics and I'd definitely recommend testing how well it washes out on a scrap before marking a garment but it's still my new favourite thing! For more sensitive fabrics the chalk dispenser is another fantastic marking tool. It produces a nice clean and most importantly bold chalk line to follow and you can get different coloured refills for it.


We all used the Janome DC3050 which, despite being computerised and therefore a fair bit more fancy than mine, I got on really well with as I also have a Janome (this one in case you are interested!). From the limited experience that I have of them I'd very much recommend a Janome to beginner seamstresses and more advanced alike. They are easy to use and maintain and also both the machines and the feet are in my opinion very reasonably priced. I can't see me being able to bear to part with my current machine any time soon but if I were to the DC3050 would be a definite contender.


Lisa and Freia from Sew Over It did an amazingly good job at keeping us chatty lot on track throughout the day. Lisa spent a fair bit of time in the staff toilets helping to fit the dresses! Above she is very generously helping me with the most tedious part of the day - turning through the casings for the elastic which were to hold the shoulders in place.


I love this series of pictures of Emmie and I! The person you can see behind me in the top picture is my Mum who dropped in for a surprise visit! She was obviously amusing both of us, but I'm blaming her distracting me for not getting my dress finished!


Clare and Emmie both picked Lisa's Betty Dress pattern so teamed up to speed along the cutting out. You can see Emmie is working on those lovely full circle skirt pattern pieces above. Clare was wearing her gorgeous floral McCalls shirtdress which I just love!


Amy and Charlie look like they are having some sort of speed sewing contest here with their heads down over the machines! Charlie is using the Janome 9200D overlocker which was set up for our use during the day to finish off our seams. It was the perfect choice of finishing for the cotton and means all our dresses look super professional inside!


Even a maternity-appropriate garment was made at the Bee! Elena (above) was the only participant I hadn't previously met and it was such a pleasure to get to know her over the day. She adapted Lisa's Ultimate Shift Dress pattern to accommodate her (not insignificant!) baby bump.


At the end of the day we got the opportunity to venture on to John Lewis's gorgeous roof garden which is only there until the end of the summer. It's beautifully decked out with flowers and provides a great view across the rooftops of London and along Oxford Street! Above are Emmie, Clare and I in the garden modelling our Cath Kidston aprons!


Roisin (a.k.a The Dress Lady) lived up to her name and proved that she is one of the speediest seamstresses in the blogosphere by being the only one of us to get close to finishing her dress. It's the perfect shape and colours for her don't you think?!


Here we all are looking very happy and colourful at the end of the day! From left to right: Freia, Lisa, Me, Elena, Clare, Charlie, Roisin, Amy, and Emmie.

Thanks again to John Lewis for having us and giving us the opportunity to sew with your beautiful new collection of prints!

Saturday 14 June 2014

Vogue 1392 & The John Lewis Sewing Bee!

A couple of week's ago I was delighted to be invited to take part in the John Lewis Sewing Bee to celebrate their 150th year of trading. I headed along to their Oxford Street store one Saturday morning and spent an amazing day making a mess of their haberdashery department sewing up dresses alongside some new and some very familiar faces. I've got another post coming up to give you more of an insight into the day, today I wanted to take a look at my completed dress!

Diary of a Chain Stitcher: Vogue 1392 in John Lewis 1950s reproduction fabric

To celebrate their anniversary John Lewis have released a special edition collection of cotton prints which they've brought back from their archives. We were challenged to sew up a dress with one of these fabrics during  the day (which with the amount of gossiping and chatting to customers we did was not a successful mission FYI!). It was a seriously tough choice but in the end I settled on the purple colour way of the reproduced 1950s design which Roisin and Clare also picked in different colours and nicknamed the 'bacteria' print!

Photo from Brian Doherty Photography

The fabric definitely played a huge part in my enjoyment of the project as it was so nice to sew with. It's top quality cotton, super soft and really lovely to wear. I don't work with or wear cotton prints very often as I prefer the drape and feel of a viscose but for this design something a little crisper was perfect.

Diary of a Chain Stitcher: Vogue 1392 in John Lewis 1950s reproduction fabric

Lisa Comfort of Sew Over It fame was there with her talented assistant Freia to keep things running smoothly and help us out with tips and advice. She'd chosen a selection of dress patterns for us to use and (after much deliberation again!) I picked V1392 which is a Kay Unger design for Vogue as I fell in love with the unusual neckline.


I don't often sew with patterns from the big 4 as I tend to find it takes much more faffing about to get them to fit. From previous experience I knew I would need to size down as they tend to include so much ease so I cut the size 10 instead of the size 12 recommended by the envelope. I was wary of going down by more than one size in case it ended up too small but I definitely could have got away with the 8 as I nipped it in further down the side seams and some areas could still do with being a smidgen tighter. I do think that this would be a good pattern for petites as I am verging on that sizing, particularly in the body, and feel that everything sits well lengthwise out of the envelope. Even the hem length.

Diary of a Chain Stitcher: Vogue 1392 in John Lewis 1950s reproduction fabric

Apart from the sizing dilemmas I absolutely loved sewing this up. The instructions were excellent, really detailed and thorough. I was delighted to discover some extra construction details in there which step this dress up a level. Well maybe delighted isn't exactly the word to describe how I felt when half way through cutting out and already an hour down on our deadline I spotted there was boning involved but it certainly made for a fun project!

Diary of a Chain Stitcher: Vogue 1392 in John Lewis 1950s reproduction fabric

Included were instructions for fully lining the dress, making your own petticoat to add fullness and for hanging loops. Looking at the cotton print I had chosen I felt like my dress would be more of a day dress so I opted to leave out the petticoat and the skirt lining too, partly because I didn't have the fabric for either! I did chose to line the bodice in my fashion fabric as I wanted a nice clean finish plus the lining is really important for creating the garment shape in this particular case.

Diary of a Chain Stitcher: Vogue 1392 in John Lewis 1950s reproduction fabric

I really enjoyed following the slightly unusual construction method for the bodice of this dress. As you can see the neckline sits slightly off the shoulder. To help this stay comfortably in place elasticated straps are concealed inside the dress which 'cling' to the top of your shoulders. The elastic is concealed within tubes of your lining fabric (or in may case the fashion fabric) and then sewn into the seams of your lining which creates a clean and professional finish. The picture below explains this much better than I can with words! I really love this technique and will keeping my eye out for other opportunities to put it to good use.

Diary of a Chain Stitcher: Vogue 1392 in John Lewis 1950s reproduction fabric

If you are tempted to try this pattern out I will recommend that you do some fairly major grading and notching of your seam allowances around the neckline and arm holes. There are lots of intersecting curved seams in these areas which needed a lot of steaming into shape to lay nice a flat despite my aggressive clipping. As the lining was all slipstitched down and this cotton was nice and tightly woven I didn't finish any of the bodice seams but I did overlock the seams of the skirt. The zip went in beautifully first time (another treat this cotton provides) and I machine stitched my hem with the matching purple thread I was provided with.

Diary of a Chain Stitcher: Vogue 1392 in John Lewis 1950s reproduction fabric

On the day of the sewing bee I made a hasty decision to leave out the boning to save time. But as I've recently learnt a lot about different boning techniques on my tutu construction course when I got home I decided this would actually be a lovely element to include. Boning may seem like a daunting prospect, I know it used to be for me, but actually the way I added it to this dress is super easy! As you can see below I used some of the cotton covered sew-in type boning (admittedly it is black which is not ideal but it's hidden away inside so who can tell?!). It's basically boning secured within a channel of tape. You simply cut the boning to the lengths you need and then sew it to the wrong side of your lining by machine stitching down each edge. Done! You could also use the plastic Rigilene boning for this which can be sewn straight in or you can create your own channels from bias tape. This pattern included really clear markings for placement, one either side of the centre front and then down each side seam. I'm really pleased I added this in as it gives some structure and shape to the soft cotton but I think would have been more effective if I had gone for a closer, more formal fit.

Diary of a Chain Stitcher: Vogue 1392 in John Lewis 1950s reproduction fabric

O and last but not least one of my all time favourite design elements is included in this pattern too...inseam pockets! With facings!

Diary of a Chain Stitcher: Vogue 1392 in John Lewis 1950s reproduction fabric

Make sure to check out the dresses the other ladies made, there are some beautiful combinations of fabrics and patterns:


If you want a sneak peak behind the scenes check out this post for photos of the Bee and my thoughts about some of the equipment (including a machine from John Lewis' varied and affordable range of machines) which we got to use on the day!

Thursday 12 June 2014

My View on Pattern Testing

I wasn't going to say anything about the recent comments on independent pattern companies and their pattern testers. Then I realised that I have been testing a fair bit recently and there are in fact a few test garments due to hit the blog in the near future so perhaps I should clarify with you guys my own personal approach to pattern testing and blogging. I in no way want to oppose anyone else's opinions on the matter or prompt any kind of further discussion I just thought perhaps you as readers would like to know how pattern testing and reviewing works for me.

Most importantly first of all; I'd never tell you guys I love a pattern when I don't or pretend a pattern is up to scratch when it's clearly not. For me the point of my blog is to share my sewing experiences and to be able to ask for help and feedback when I need it in order to improve my sewing. I know I do a fair amount of raving about patterns which I have success with but that's because I am genuinely proud of what I have made and love how it has turned out. If I love something I sure am going to let you guys know about it!


I don't often blog about projects that go wrong (partly because I still hope that I can salvage them) and if a test happens to be a complete disaster I won't blog about it as changes should have been made to the pattern and there would be no point in sharing a garment review so different to the finished product. But I am very happy to say if I have problems with a pattern (including tests) and have done in the past. I do, however, strongly believe that there's no need to be cruel about something that someone has put so much work into. A negative review should be well thought out and explained.

It is important to remember that everything I write about a pattern/fabric/technique on this blog is my personal opinion. It doesn't mean that you or anyone else will think exactly the same. Just because a pattern doesn't work for me or isn't to my taste doesn't mean it won't be a dream sew for someone else. In my opinion no single negative experience can ever totally write a pattern off and when considering a purchase I never look at just the one blog. It can be hard to tell sometimes whether the problem is the pattern or my own poor fitting/sewing skills/bad fabric choice e.t.c so in my posts I try to just lay out the facts. I aim to be frank about my experiences with each and every pattern in the hope that it benefits other bloggers. I try to include what I hope is useful information about fabric quantities needed, the alterations I made, specific techniques I used and what I might do differently next time.

There are many great plus points to being a tester; a free pattern, an early preview, getting to be part of the secret and in the case of success a new garment and feature for the blog. But none of this would ever sway the opinion I share and I have never been offered any kind of pay off for a good review. Yes, By Hand London arrange for their testers to receive fabric for their test for free but they also always explicitly request honest feedback and I have never been required to blog about my test garment. Testing a pattern and writing up feedback takes much longer than it does to sew up a usual garment and when you are purchasing fabric to test a pattern you are investing financially in a garment which has more chance than usual of being unsuccessful. So I see any free supplies provided for a test as a thank you for the time taken and an aid with the expense of helping the company improve their product. At the same time I would never expect this of any company asking me to test and the thought 'hey, I should be getting paid for this' has never crossed my mind. If I do receive anything for free I will always make this clear in my post.


I have always imagined that testers are chosen based on their ability to review the pattern and give good honest feedback. I do agree with comments that perhaps a wider range of body types e.t.c would sometimes be a benefit. One of the things I like about blogged test garments is that soon after release I get to see the pattern made up in different fabrics and worn differently before deciding if I would like to purchase it. It would however make me unhappy to think that bloggers were chosen mainly as a means of advertising rather than for their skills. If any designers were to EXPECT promotion on top of the time put into testing that would be wrong and there's never any guarantee that I will blog about any of my projects. It's my choice what I put on my blog.

I feel like I should briefly mention my Indie Pattern Update posts as they are basically all about spreading the word about indie! I am in no way compensated for these posts, although I have recently received, through no suggestion mine, two free patterns as a way of thanks for spreading the word. I am not supplied with information to include, I simply gather it up throughout the month from my blog feed and social media. The vast majority of the new patterns I list I have no personal experience of so I am not making a recommendation, I'm just spreading the word about the release. These posts are my way of showing my support for all the hard work and long often after work hours these talented ladies (and men!) put in. With the detailed pattern instructions, sew-alongs and tutorials they provide these guys (along with your blogs) have pretty much taught me to sew and I want to say thanks!

At the end of the day we're all different with different bodies, lifestyles and tastes. The upsurge of indie pattern designers within this wonderful online sewing community can only be a good thing as the huge variety now available means there's truly something for everyone. For me the pattern testing process is an important step in developing these patterns and is therefore one that I take seriously and invest a lot of time and thought into. I do it because I love sewing and would love to do just a tiny bit to help the industry flourish. If I'm not going to be honest in my feedback both private and public then what's the point?

Tuesday 10 June 2014

Polka Dot Laurel Blouse

Diary of a Chainstitcher: Polka Dot Laurel Blouse from Colette Patterns

Today I've got a make to share with you which I briefly mentioned in my round up of Me-Made-May. I finished this project at the start of the final week and it's such a success that I wore it twice before the end of the month and it's been on at least once again since then!

It's the blouse variation of Colette's Laurel shift pattern which my wonderful Dad treated me to for Christmas last year. I nudged him in that direction as I loved the style of it despite the reservations I had about how it might work on me as I've tried on many an unflattering shift dress in the past. However, despite the lack of waist darts I don't at all feel like I'm wearing a sack and I am absolutely delighted with the result! 

Diary of a Chainstitcher: Polka Dot Laurel Blouse from Colette Patterns

The only other Colette pattern I have made up for myself is their free Sorbetto Blouse which I had some real fit issues with. For this make I cut the size 2 and overall was pretty delighted with it straight out of the envelope. It's very slightly tight above the bust when I move about so I might adjust this on my next version but apart from that it's a real winner and has definitely made me want to try out some more Colette patterns. The only other thing I have to say about the fit is that I feel this is a perfect length on me at 5ft3" so if you are taller I would consider whether you need to lengthen the bodice and/or sleeves.

Diary of a Chainstitcher: Polka Dot Laurel Blouse from Colette Patterns

I love the chic figure skimming fit of the blouse, which is largely created by a pair of double ended darts in the back. It was my first time sewing this type of dart but it was very straightforward, not much different to a normal one! I think this is a great pattern for a beginner seamstress as it's not too involved and includes a couple of different techniques like these darts and the bias tape finishings which are well explained and illustrated in the instructions.

Diary of a Chainstitcher: Polka Dot Laurel Blouse from Colette Patterns


The only change I made in terms of construction was the finishing of the neckline. The instructions call for you to use bias tape on the edges which worked perfectly on the cuffs (I did cheat and machine stitch it down rather than slipstitch by hand as it barely shows on the dark crepe). However when it came to the lovely shape of that neckline I could not get the bias tape to sit nice and flat for the life of me. I think to finish it that way I would have needed very narrow bias tape and I was unsure about how neat I would be able to make it. I know opinions about facings vary quite widely but I personally love them so I decided to unpick my binding and draft my own for Laurel. This is very easy to do and Colette actually have a fab tutorial on it here (using another of their patterns to show it but it's exactly the same thing!).

Diary of a Chainstitcher: Polka Dot Laurel Blouse from Colette Patterns

This worked out so much better than the binding but despite clipping seam allowances and under stitching (which also stops the facing flipping out to the right side) still the neckline was not quite flat! I felt with this style of neckline and shape of top this was really important so just bit the bullet and topstitched it very close to the edge. You can actually hardly see the stitching and it 100% solved the problem so I'm happy with that solution. I think it would have been less of an issue in a fabric which doesn't have as much body.

All of the seams and the edge of the facing I finished on the overlocker which worked fantastically with the weight of the fabric; I'm super proud of my professional looking insides!

Diary of a Chainstitcher: Polka Dot Laurel Blouse from Colette Patterns

I used a polyester crepe which I picked up in John Lewis's January sale. I was a little apprehensive about the poly but it felt so lovely with great thickness and weight to it that I took the plunge anyway. I'm glad I did as it doesn't feel particularly synthetic at all and was fantastic to work with. I initially picked this up with the intention of making a La Sylphide Blouse (after seeing Lauren's gorgeous polka dot version for the sew-along) but at the last minute before cutting I decided that maybe I should go for a simpler silhouette and make something more easily wearable. I still couldn't resist a little bit of extra something though so cut out the 1960s style gathered cuffs which were eventually vetoed, I need to learn that sometimes plain and simple is the way to go! Discounting the cuffs but including my extra facings I could get the pieces for this out of just 90cm of 150cm wide fabric.

Diary of a Chainstitcher: Polka Dot Laurel Blouse from Colette Patterns

It's exactly the kind of garment that I need to be making as it's something I will get a huge amount of wear out of: I feel comfortable yet pulled together in it whether it's paired with jeans for work or with a pencil skirt for dinner/drinks. I'm really looking forward to making up one of the dress variations too so expect to see a lot of this little pattern around here!

Tuesday 3 June 2014

Me Made May 2014 Round Up!

This year I decided not to make a Me Made May pledge, but instead to document all the 'me-made' clothing I felt like wearing and was practical for my life during May. I didn't want to feel the pressure of having to wear hand made clothing a certain number of times a week but I was interesting in thinking about how suitable my current hand made wardrobe is for my day to day life. I also chose not to do regular blog posts on the subject to instead to record my outfits with easy selfies and snaps via Instagram. This meant this aspect of the challenge was a lot less time consuming and stressful this year, although I still managed to fail on a couple of days and had to take a couple of non modelled garment pics after the event! It felt like many bloggers chose to use Instagram this year (with the hashtag #mmmay14 if you want to check it out) and I for one loved being able to follow everyone's May journey this way!

Anyway, so how did I get on?


Well I wore at least one me-made garment for 16 out of the 31 days in May which I'm pretty impressed with! It felt like that was approximately the number of days I would have worn me-made items anyway so I'm really pleased with how well my makes are slotting into my RTW wardrobe.

I only allowed my Robson Coats when worn with a RTW only outfit to count as a me-made day once each (days 3 & 20) but did allow myself repeats of other items. Excluding my Robson's my most worn item was definitely my silk Scout Tee (days 7, 13 & 22). And if you count my pleated voile Scout on day 11 that's 4 days out of 16 for that pattern! Jeans are just the most practical choice for work for me most days and making an effort to think 'me-made' in the mornings made me realise that I need to make more woven tops like this. A fact confirmed when I made a polka dot Laurel Blouse at the end of the month and ended up wearing it twice! I also need to get involved in the Jeans in June challenge and make myself some skinnies, that would make next year's MMM a breeze!

My Archer Shirt (days 4 & 18) was also a popular choice which surprised me as I've never thought myself much of a shirt wearer and so never bought one. Only after making this white one have I realised how versatile a garment it is. A black one is now on my sewing list!

Thinking about dressing handmade caused me to revisit some garments such as my Simplicity 2444 dress (days 12 & 25) which since making I've worn less than I expected because it's not the best thing I've ever made, with some fairly sloppy seam matching. However the print disguises all this and I discovered this month that I feel pretty great in it. plus it now has some lovely memories associated with it from Roisin's Spoolette hen do!

London had a fairly random mixture of weather over the month which made keeping a variety of outfits slightly easier. I definitely find it easier to dress handmade for the sunshine! I can't wait for some real summer heat (fingers crossed!) so I can wear my Tania Culottes ALL the time. I felt great the day I wore those (day 18) and would like to make another pair. This would also help with another goal I identified, which is to make more bottoms I can wear with my Coppelia Cardigans (day 8). I love the style of this pattern but they are unfortunately just a little too short to wear with my jeans and not ride up throughout the day. I need some more high waisted skirts and trousers to wear with these and would like to make a longer cardigan like Lauren's.

So I'm pretty pleased with my MMM this year and will definitely be taking the same non-pledge approach next year! Did you take part and how did you all get on?